Monday, February 28, 2011

Feb 26th: Paper Invitations

Don't look at me like that. Wedding invitations are art! Especially if you make them yourself. Which I am! They're also time consuming which is why I don't really have any real art to post at the moment. So I'm busy, give me a break! I printed out the script (because God knows my handwriting isn't nearly that good) and hand-cut all the paper. The clear stuff on top and the purple below... and that took almost two hours. Thanks to one of my bridesmaids, I have some pretty awesome silver ink that I'm using to stamp a tree in the middle. The tree, admittedly, has nothing to do with our wedding or the theme. I just think it's cool looking. Hmm, guess you can't really see it so well in this picture, but you'll just have to trust me.

Luckily, when you get married you have a dozen friends who are not only willing to help you with such projects but actually get offended when you do anything without them. Anything. So although I've gone the cheapskate route and made my own invites, at least I'll have some help assembling them. It's art, I swear. It counts!

Feb 25th: Graphite Newborn Portrait

Finally had some time to sit down and start to graph a portrait I need to do. Yup, it's another baby. A newborn actually, which probably explains why his hand is creepy and wrinkly... I've drawn a lot of babies, and I can honestly say that I've never seen a hand quite like it. Anyways, at the amazing art store that I drooled my way through the other day, I purchased a grid. I was hoping that it would be clear... because one would assume that clear would be the best way to go... but it's opaque white. I can see the portrait underneath it... I'm just afraid that the details don't show too well. I think what I'm going to do is use the grid for a general outline of main proportions and then remove the photo once I have that.

After some debate between my fiance and I as to the best way to convert the grid to the drawing paper (why is there always math everywhere?!) I drew an outline. Didn't get very far. I find the red lines to be distracting and my eyes didn't know which box to focus on to draw. So I'm not sure that buying a grid made my life any easier. I might just have to go back to drawing my own so my eyes don't fall out and it doesn't take me twice as long to draw a line.

Feb 24th: Random Pen Drawing

Life's insane this week. I'm in the middle of switching jobs, finding a new place to live and planning a wedding. It's crazy. I've been lucky to have any time to draw when I'm not cleaning house or something, so bear with me this week! All I have for this day is some more anime. Always the easiest fall back I know.
I realize that drawing anime isn't going to help me learn anything but anime proportion, which is unique to the style. I mean, if people really had eyes like anime characters, they'd look pretty freaky. Regardless, at least I drew something. Next time, I'll start working on another baby portrait for my aunt.

Thursday, February 24, 2011

Feb 23rd: Pen Drawings from Life

My Betta Miko makes a terrible model. No matter how much I pleaded with him, he wouldn't stop swimming around like a crazed fish. He's always hungry. So when I get up close to his tank, all he assumes is food. Now, I know that gesture drawing is good for moving subjects, to sketch like mad and hope to get some kind of outline and some semblance of movement. I don't know how well I did that. In fact, I got so frustrated with his frantic movements that I ignored him for a while and drew one of the incredibly fake looking plants in his tank. Oh Miko. My favorite drawing captures his attitude completely. It's one that says: "Feed me now human, or suffer the consequences!" Which is Miko's attitude all the way.

When he calmed down, I could finally get fins and details in there, but I don't think that details and exactness are the point. Especially when you're drawing something that's moving around. It's how to guide the eye of the observer with nothing but a few lines. If you're good enough, they'll understand what the object is and how it's moving even if it's a nonsensical blob of lines. Me? I'm not sure if I'm to that point yet, but I'm sure gonna try.

Feb 22nd: Random Pen Drawings

Tuesday was one of those days when I had things I should be drawing, but decided to draw some nonsense instead. It was too late at night to bust out the watercolors, and I didn't feel like gridding the drawing I have to do next. So I drew some anime instead. Slacking, I know. Still, art is art. I went to my first professional art store the other day and salivated over everything. There's so much stuff! And half of it I have no idea what it's for! I bought some watercolor paper, some masking fluid and a grid that lays over photos or whatever you're drawing. What I really wanted to do is max out my credit card there. Markers, colored pencils that cost $2.50 a piece, brushes (oh the brushes!)... I want it all! I also found transfer paper that would help me so much with my ornaments, but next time!

Tuesday, February 22, 2011

Feb 21st: Watercolor Landscape

I'm starting to like watercolors a little bit more. I turned my twilight into a sunset. I think it looks much better that way. I laid an orange wash over the original and added spots of orange in the waves. I made the mistake of trying to lay the wash over the water and just ended up smearing blue all over the place and getting rid of the light parts! Luckily, I was able to pull out the worst parts with a paper towel, and somehow the smearing didn't end up looking so bad.

I didn't really define the waves on the bottom of the painting, because I planned on making a beach. Never did... but it worked. I think that maybe the sun could be a little brighter, but considering the fact that I didn't mask it, it's ok. At this point, the salt pattern kinda looks like birds. The last thing I did to the sky was add yet another wash from the top of violet to make it look more... awesome.

I considered leaving the painting the way it was, but I felt that it needed something. My fiance wanted me to paint a ship... but I can't paint a ship from memory. So I decided on palm trees. I had to practice to get them down right, but once I figured out the basic brush movements, they're actually extremely easy. Just quick downstrokes with an angled brush. Some thin lines to indicate individual leaves and bingo! I'm super happy with the trees. All in all, I think I turned a disaster of a background into something fun and it was good practice.

Feb 20th: Watercolor Landscape

I started painting on the background that I like the least. Mostly because it can only go uphill from here. Right? These are the things I tell myself. I didn't do much. I decided that more than anything, this botched wash looks like a sunset or twilight. So I commenced with painting some water. Prussian blue, black and a little bit of crimson. Water can be hard. Especially when it comes to reflections and waves. But this water is fairly still so... not so difficult. Even though it's best to mask out a section that you know is going to be white, I didn't have that luxury. So I took some Chinese white and made a moon. At least I think it's a moon. Might be a sun. I was thinking twilight because the salt spots kinda look like stars. The awesome part is that the wash behind the waves just makes it look like the reflection of the sky. Good times. I think I might add a ship or palm trees or something tomorrow.

Saturday, February 19, 2011

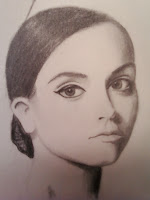
Feb 19th: Graphite 3/4 Face #2

Today is one of those rare, special days when I'm caught up on my posts. And the peasants rejoiced! So, as I'm currently in a place that I couldn't bring my watercolors and such, I worked on my 3/4 face today. I fixed A LOT. Mkay, so I started with the eyes. Yes, the one on the left was too low. I basically took the picture I'm drawing from and drew lines all over it. I drew a line from the corner of the eye on the left to the corner of the mouth... and measured everything like that. Before I was eyeballing it... and it shows. So on the right is me erasing things and fixing the eyes.

The mouth was also moved up. The chin elongated. The forehead scaled back. The skull elongated. The pupils fixed. It was almost like starting over today. However, when I look at how the drawing was this morning, and what it is now, it makes me really happy. It's looking like the actress! Who'd have thought? Now if only I could figure out how to draw without having to go back and correct everything! *sigh*

Feb 18th: Watercolor Washes

I'm not exactly good at watercolor. In fact, I'm slighly clueless. So I went to the library and checked out like five books on it. There's a ton of good tips in them, but from what I read, you have to start by learning how to do backgrounds. I don't have watercolor paper. I really wish I did. But the drawing paper I have now will just have to do for the moment. Watercolors are done in layers, starting with the lighter background and then getting darker and darker the more you layer on. So, I really drenched my first paper and tried to do a wash. Simple right? Pssh. Yeah. It ended up all blotchy and streaky. But I took the opportunity to try sprinkling a little salt on the page. All of the books said that salt made an interesting background pattern. If anything, at least I learned how not to do a wash.
My second attempt was with blue and I did much better. The key isn't adding more pigment, but adding more water as you move down on the paper. I got a nice fade. The last one is my favorite. I did a Burnt Sienna wash and then while the paper was really wet, I splattered some prussian blue all over. The effect is pretty fun. Before starting the paintings themselves, the backgrounds had to dry overnight. So I'll have to come back to them and see what happens.

Feb 17th: Quick Pen Life Drawings

Not much time to do art recently! Gah! Stupid life getting in the way of my art. Pssh. I busted out some quick sketches. One is of a girl on the computer where I work and the other is my fiance sleeping. I like to draw people when they aren't paying attention. It seems more real to me. Might be slightly creepy though...In my old college notebooks, there's so many drawings of the backs of people's heads in the margins. You can tell which classes were the most boring because they had the most drawings.
I find that trying to draw a figure that changes positions every few minutes is good for me. It forces me to draw quickly and not worry about details so much. If I focus too much on one aspect, they'll move and I'll be left with an incomplete hand or something. So it's better to just sketch like hell and see what comes out. I like the one of my finance sleeping the best. It's simpler than the girl at the computer and yet gets the point across. I think I like the pillows best.

Thursday, February 17, 2011

Feb 16th: Acrylic on Glass Ornament

Well, it's finished! Oh the issues I had with the sealant. So here's the process: I take elmer's glue and smear it around close to the edge of the painting. This makes a nice, clean line whenever I'm done spraying sealant. It peels right off. Then I put plastic wrap over the rest of the bulb to keep it nice and clear. Well, last night I grabbed some matte spray, not thinking much of it and ended up with a cloudy finish. Crap. I needed to spray gloss! So I rummaged around and found the clear gloss. Luckily, when I put on a coat of gloss and stuffed the bulb with tulle, it looks just fine. I was a little weary when I was putting tulle in the bulb. I've never used it in an ornament before and I was skeptical as to whether or not it would look good. It totally does. You can't put in a lot though, because you can't see the nice creases it makes. Just a little. I hot glue the caps on all the ornaments because that would suck if it just came off. Anyways, it's time to ship it and move on to my next project!

Feb 15th: Acryclic on Glass Ornament

The only thing I had left on the wedding ornament is the leaves or vine or whatever it is that appears on their invitations. So Tuesday, that's what I worked on. It was slightly difficult for me because the picture I had to go off of was pretty small. But, I was able to see the basic shape of the leaves and was able to fudge it. They turned out well. I also added a little touch of gold and dry brushed it on one side of the leaves. I get asked a lot how I get lines so thin. It's not a matter of painting a really thin line. I paint a thicker, imperfect line with basic shape and then I scratch the edges down with a toothpick to make it really thin. So really, I'm not that amazing haha. The only problem with scratching acrylic paint off of glass is that the paint may chip where you don't want it. Or it'll bunch up and take a chunk out when you only needed to remove a tiny strip. As a result, There's quite a few touch-ups. But, I still like the method. It really doesn't work for the frosted glass though... Which is why the unfrosted is so much easier. Tomorrow I'll put the finishing touches on, add tulle and seal it.

Tuesday, February 15, 2011

Feb 14th: Graphite 3/4 Face #2

Is she less creepy? I think so. In desperate need of shading, the face looks more like the picture. I re-shaped the eye on the left. Turns out, the eyeliner really was throwing me off. So I pretty much erased a lot of it and focused on the shape of her eye. Now that I'm looking at it... the eyes might be too far apart. Hmm...I also had to lengthen her forehead which is something that shouldn't have to happen. The construction of the face shape should be something that's almost right on in the beginning. This late in the drawing, I really shouldn't be making changes. I don't have an excuse. In a lot of art books, they encourage you to draw the shape of the skull first. Seems like a lot of work to me, but seeing as my actresses forehead was too short, perhaps I should consider it. I need my kneaded eraser to pull light out in her eyes, but I don't have access to it at the moment. Once again, to shade I have 3 well worn stubs and a kleenex because I always forget the chamois at home. Sigh. I'm starting to think that it would be beneficial for me to draw some 3/4 faces from memory instead of drawing from a picture. Perhaps that would teach me more effectively how to pull it off.

Feb 13th: Graphite 3/4 face #2

Well, the memory card for my phone is a piece. I don't think I'm going to get the pictures I want from it, but luckily, today's pictures are coming from my digital camera. You can kind of see the lines intersecting the face and how I started, seeing as I couldn't post it yesterday. Ok, I'm aware that she looks wierd and creepy as she is now. The actress is wearing tons of eyeliner and I only got to the one eye. So she looks so strange. It may be because there's no shading or anything, but the left eye looks too low. But I measured and measured again! It's where it should be! I'm convinced that it's just the lack of shading and too much makeup. That's what I'll tell myself to feel better anyway.

Randomly, I'm proud of her nose so far. She's got a distinct nose and I think I got the exact shape and angle. Sa-weet. Next post she won't look so disturbing. I'll add darker values and shading. Right now she's only done in a 2H pencil. I need to focus on shape and placement rather than her eyeliner! But it's so distracting! I want to wipe it off so I can see her eyes better haha.

Feb 12th: Graphite 3/4 face #2

The 3/4 face beckons once again. I'm having huge problems with the memory card from my phone. It has the pictures of the drawing on it and won't let me get to them! In fact, it keeps freezing up the computer whenever I connect it. Funny, it does the same thing to my phone... So I might not have a picture! That's what I get for using my phone and not my digital camera. Anyways, I continued to practice drawing 3/4 face using basic shapes like circles and such to get the general shape down. What's killing me in the beginning is the eyes. Not so much where they are on the face... just what angle they have to be at. It's very confusing.

I realize now how important it is to not draw on a flat surface. It really effs everything up. The drawing might look ok from where you're sitting, but then when you look at the drawing straight on, it's completely off. I have to always remember to draw on a slanted surface. I really need an easel. Hopefully I'll get this damn memory card to stop malfuncitioning and post the pictures. Once again, it's a celebrity, but I won't tell who! (Just in case it ends up looking nothing like her) Haha.

Feb 11th: Acrylic on Glass Ornament

Mkay, back to the ornament! So I finished the flowers and the script on Friday. Even though I only changed little tiny things, I'm going to post the picture anyways. When I do script or something like it on glass, I have a technique. Rather than trying to free hand the script and take freaking forever, I do something that I learned from a random artist at the Renaissance Festival years ago. First, I print out the script so it's exactly the size I want it on the bulb. Then I cut it out and smear white pastel all over the backside. Then I tape it to the bulb, making sure it's straight. Then it's just a matter of taking a toothpick and running it over the script. When I take the paper off, then the image is on the bulb and I just paint over the pastel. Genious no? Muahaha! Yeah, so it's cheating, but I figure it's better to cheat on the script than cheat on the painting itself. People want the script to look nice!

All I have left on this ornament is to add bits of green vine that appear on their wedding invitations and to cram some tulle into the bulb. It shouldn't take long at all except perhaps the fact that the picure I have of the invitations is way too small and I can't really see the leaves... I might have to fudge my way through it. It's a good thing I'm proficient at making stuff up.

Friday, February 11, 2011

Feb 10th: Old School Drawing From '00

Today's selection of art comes from my Sophomore year of high school. Slightly less embarassing than the Backstreet Boys, I tried to tackle Neo from "The Matrix". Now, despite the fact that none of the faces look even remotely like Keanu Reeves, I like these. This is where I learned how valuable a tool an eraser can be. To get the texture of leather and vinyl, eraser can be used to pull out light spots. This drawing is when I first learned that.

It's funny to see how line-y everything is. When learning to make things realistic, you learn that things like mouths and facial features can be implied with shading technique rather than line. I hadn't quite realized that yet in high school... It's fun to see how I was figuring out things like texture even at that early stage. I think that it would be fun to re-draw some of these things I drew and compare. Maybe someday! Well, if I end up slacking off again, there'll be more old, embarassing drawings to come. As for Friday, it's back to the ornament.

Feb 9th: Old School Drawing from '98

You might be saying to yourself: "Self, I think she's posting old drawings because she didn't do art today" to which I can reply... maybe... Ok, ok. So Wednesday and Thursday were no-goes on the art. Not my fault! Well... Wednesday was. I was just lazy. So for Wednesday and Thursday I'm going to post some really, really old stuff. This one is the oldest drawing I have. It's from when I was 13. These drawings were made when I first realized that I had some kind of underlying talent.

Everytime I feel like I'm not making very much progress, I like to look at these drawings and remember how far I've come. These are all versions of the hottest person ever when you're 13 in the 90's... Backstreet boy Nick Carter. Hahaha! So funny. They look nothing like him! I remember taking the booklet out of the CD and deciding to draw him. I showed the drawing to my dad and I think he got super excited that I showed some kind of promise. Looking back, it's not bad for a 13 year old with no art training. Is it still embarassing? You bet.

Thursday, February 10, 2011

Feb 8th: Graphite 3/4 Face

I know I say this all the time, but I can't wait until we get the internet back. My posts get so behind when I don't have access everyday. Ugh. Anyways, I continued working on my 3/4 face. If you can't tell who it is, I'm not saying. Granted, the actual picture of him that I went off of doesn't really look like him either. But, it's besides the point. So I think I fixed the eye on the left. It just needed some strategically placed shading. Let's see... what did I learn? Eyes are funky in 3/4 view. I learned to pay super close attention to the angle of the eyes because otherwise they'll look funny. Measure and measure again. I think the right eye might still be too high. But then again, maybe not.

I actually think I did a pretty good job. The shading is choppy and streaky, but that's because the only supplies I had with me were stubs and kleenex. I keep telling myself that it's ok because I'm just practicing. I'll most likely get behind again on posts, but never fear! The art shall continue!

Monday, February 7, 2011

Feb 7th: Acrylic on Glass Ornament

I'm actually not done painting for the day, but I'm going to post what I have done so far while I have internet access. It might not seem like I've done anything when you look at the picture, but I have. I started to blend things today. Added more shadows and highlights. I've also started to paint in little details and such. I'm getting really close to a nice violet color. I don't want too much blue or purple. Something in the middle is nice. It seems like no matter how much I blend, it's never enough. It still looks unfinished and choppy. The petals need to be given more depth and character. After all, petals aren't always perfectly shaped. I don't want the bouquet to look fake, but I do want a certain amount of artsy-ness to show through. If that makes any sense at all... So tonight I'll keep working. I work late tomorrow, so it might be 3/4 face again next time.

Feb 6th: Acrylic on Glass Ornament

Back to the ornament! It might just be because I'm coming from canvas painting, but I'm having a hard time with this bulb. It's difficult to blend and make the colors soft and gradual. Bah. When painting glass, it's all about layers, layers, layers. If you don't have enough layers, the color will lack depth and be boring. It'll also be easier for the paint to flake off if your brush is too wet. That's super annoying and creates see-through holes in the work. So really, when you see a purple flower, it's got plum, violet, lavender, purple and white all mushed in it somewhere. It would be nice if I could find the exact same color every time, but every time I go back to it, I always get a different shade of purple than I ended with the previous day. But, again, flowers are versatile. If they differ in color, it's ok. There are different colors and varieties in nature, so it works. What I worked on most this time was creating depth. I made shadows and highlights. Didn't worry too much about blending just yet. That'll be at the end once I've defined individual flowers and petals.

Feb 5th: Graphite 3/4 face

So, I couldn't get to the bulb on the 5th... my bad. Painting just wasn't happening *shrug*. My Sensei is probably the most honest person when it comes to my artwork. She tells me that the thing I paint most and need the most work on is the 3/4 face. I admit, they're not my favorite thing to do. It's easy to make a symmetrical face... one that's looking straight forward... but 3/4 faces are funky. One eye's higher than the other. Half of the mouth is practically not there. You can kinda, sorta see one nostril while the other is in full view. It's just not easy!

So, gleaning what I've read these past couple of weeks, I tried to implement techniques. I started by making an oval in the basic shape of the figure's head. I then sketched lines for the eyes (halfway down the oval), nose (in between eyes and chin) and mouth (guessed at that one). It seemed to work well. Using my pencil to measure, I payed close attention to where the features were in relation to each other. I made sure the eyes didn't go past the corner of the mouth, etc. It was also important to pay attention to how high the right eye was in comparison to the left. Making them too high would make him look like a freak. It's not done yet, but what I do like is the mouth. Good mouth. But the eyes... Hmm. Well, I'll figure it out and let you know. Perhaps because there's no shading on the left side of the face yet... but something's funky. Anyways, my time shall be mostly devoted to the wedding bulb, but when I can't paint, I'll work on 3/4 faces.

Friday, February 4, 2011

Feb 4th: Acrylic on Glass Ornament

Ok, time to get back to the ornaments. Last time I painted an ornament was December and it's a little hard to go back to a smaller scale than canvas. You would think that painting on a smaller scale would be easier, but really it's more challenging. This ornament is for a wedding in March so I better get cracking.

When starting any ornament, I start by creating the basic shape of whatever it is (in this case, a bunch of flowers) in white paint. I need to create a good base with the white because otherwise the paint will flake and rub off. Such is the nature of acrylic on glass. Once I got a good base, I began to add basic colors and shapes of petals. Flowers are versatile and look good whether artsy or realistic looking. I find I can play around with many colors and shapes and still end up with a good looking bunch of flowers. So that's what I did here. Just mixed different variations of purple, red and white and went nuts.

I ended with a basic idea of what I want and will begin to refine it and make the flowers more realistic tomorrow. The great part about painting on glass? It's ridiculously easy to scratch mistakes off.

Feb 3rd: Pen Cartooning

I had no time this Thursday. It was just a crazy busy day. So I didn't have a chance to try anything new or learn a new technique. Instead I found a book on cartooning and drew from it. I like cartoons because even if you don't get the faces perfect, it doesn't really matter. Cartoons are simple. I can draw them from a book, but my ability to create them from memory is harder. The cartoons that I draw myself are passable; nothing that would be in a comic book. The Sunday funnies sure. One of my all time favorite comic artists is Todd McFarlane. He does the "Spawn" series. The artwork is so intricate! It would take me weeks to draw what he probably does in hours. He's pretty amazing.

Anyways, my random cartoon drawings are all of old men... a subject that I probably never draw unless I'm paid to. These were done in purple archival ink. I couldn't tell you what kind of pen I was using because it's from Germany. Awesome anyway.

Thursday, February 3, 2011

Feb 2nd: Watercolor and Pen

Watercolors are probably the hardest paint to deal with. You can't paint over your mistakes; you can only make them darker. The only experience I've had with watercolors was gained in elementary school with my Crayola set of 12 colors and a fraying paintbrush. Those were the days. Now I have this awesome stuff in tubes and I figure, I should try.

I started with something easy to practice. My fall-back is anime. So, I started with a basic outline of Tohru Honda (Fruba FTW!) in graphite. I then set about to paint her in watercolor. It was pretty much as hard as I expected it to be. Colors bleed together. Skin tone is pretty hard to acquire without looking too orange, too yellow, too brown... etc. So I settled on orange because that was close enough. In real life, the color isn't so horrifying until you see the shading on her neck. Wrong color plus the paper got so wet that it started to come apart. Yay...

Watercolors alone weren't going to work for a final product. It was too blah and in desperate need of some outlining. So I outlined Tohru in india ink and it looks much better. So, it's ok. Not the best watercolor, but passable.

I'll have to practice more to get the hang of it.


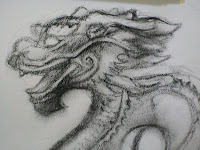
Feb 1st: Charcoal Still Life

As I continued working on my still life, I began to wonder why I picked such a hard object. There's scales and spikes and loops... Most people sketch fruit and dishes... Anyways, as I sketched along I realized that right away when using charcoal, light areas need to be marked somehow. That way you don't smudge over the light spots or make them too dark to be able to pull out with an eraser.

The dragon is supposed to look shiny. Or at the very least, plastic. It's technically resin, but shiny nonetheless. I don't know how shiny I got it to look. Nor did I want to take the time to sketch hundreds of individual scales. But, regardless, I sketched until it was kinda done. The loops are all wrong! They don't look like they're a smooth coil. Kinda kinked and awkward really. That has a lot to do with me not measuring the negative space with my eyes well enough. Bah. I don't think I'll finish it, but it was a good try. Next time I do a still life, I'm going to pick something a little simpler to draw until I get used to looking at a 3D object.

Tuesday, February 1, 2011

Jan 31st: Charcoal Still Life

Yesterday night I snatched my dragon off of the fireplace mantle to draw it. I'm not good at still life's. Maybe it's because with a picture, the light never changes, the subject never moves and you can take it wherever you want. I also decided to work in charcoal which is another medium that I'm reluctant about. You can't really erase charcoal. One thing you can do is make it darker over your mistakes. So that's what I did. I started with an outline as light as I could draw it in vine charcoal and tried to focus on shape rather than detail. A big problem of mine is focusing too much on detail too early in the drawing and not on shape. That's when proportion gets messed up.

I decided to draw on bigger paper than I'm used to. I want to get used to drawing with larger arm movements rather than small, short hand movements. Once I'm used to it, drawing will be easier and I won't try to be so precise right off the bat. Smudging charcoal/graphite with your finger always makes me shudder, but yesterday I went for it. I know that over time the oils in your fingers could yellow the art. But since I'm just practicing, I smudged away. It worked pretty good. I think that for my charcoal work, that'll how I'll do blending unless I'm doing something that needs to last a long time. I'm doing better than expected. I wish there weren't so many scales...